Website hosting with Neocities
To host our exercises, we'll be using Neocities — a free hosting service, a lovely indie spiritual successor to Geocities.
Go to Neocities
If you already have your own website host, you can continue to use this. This is primarily for those without a hosting service yet.
- Create a Neociites.org account, choosing a URL, and verify your email.
- Once verified, head to your Go to your Neocities dashboard or hit
Edit Sitefrom the home page. - You will see this dashboard, which is all the files hosted on your site — a mix of HTML files and styling files. We'll mostly just be making html files (with the
.htmlextension at the end.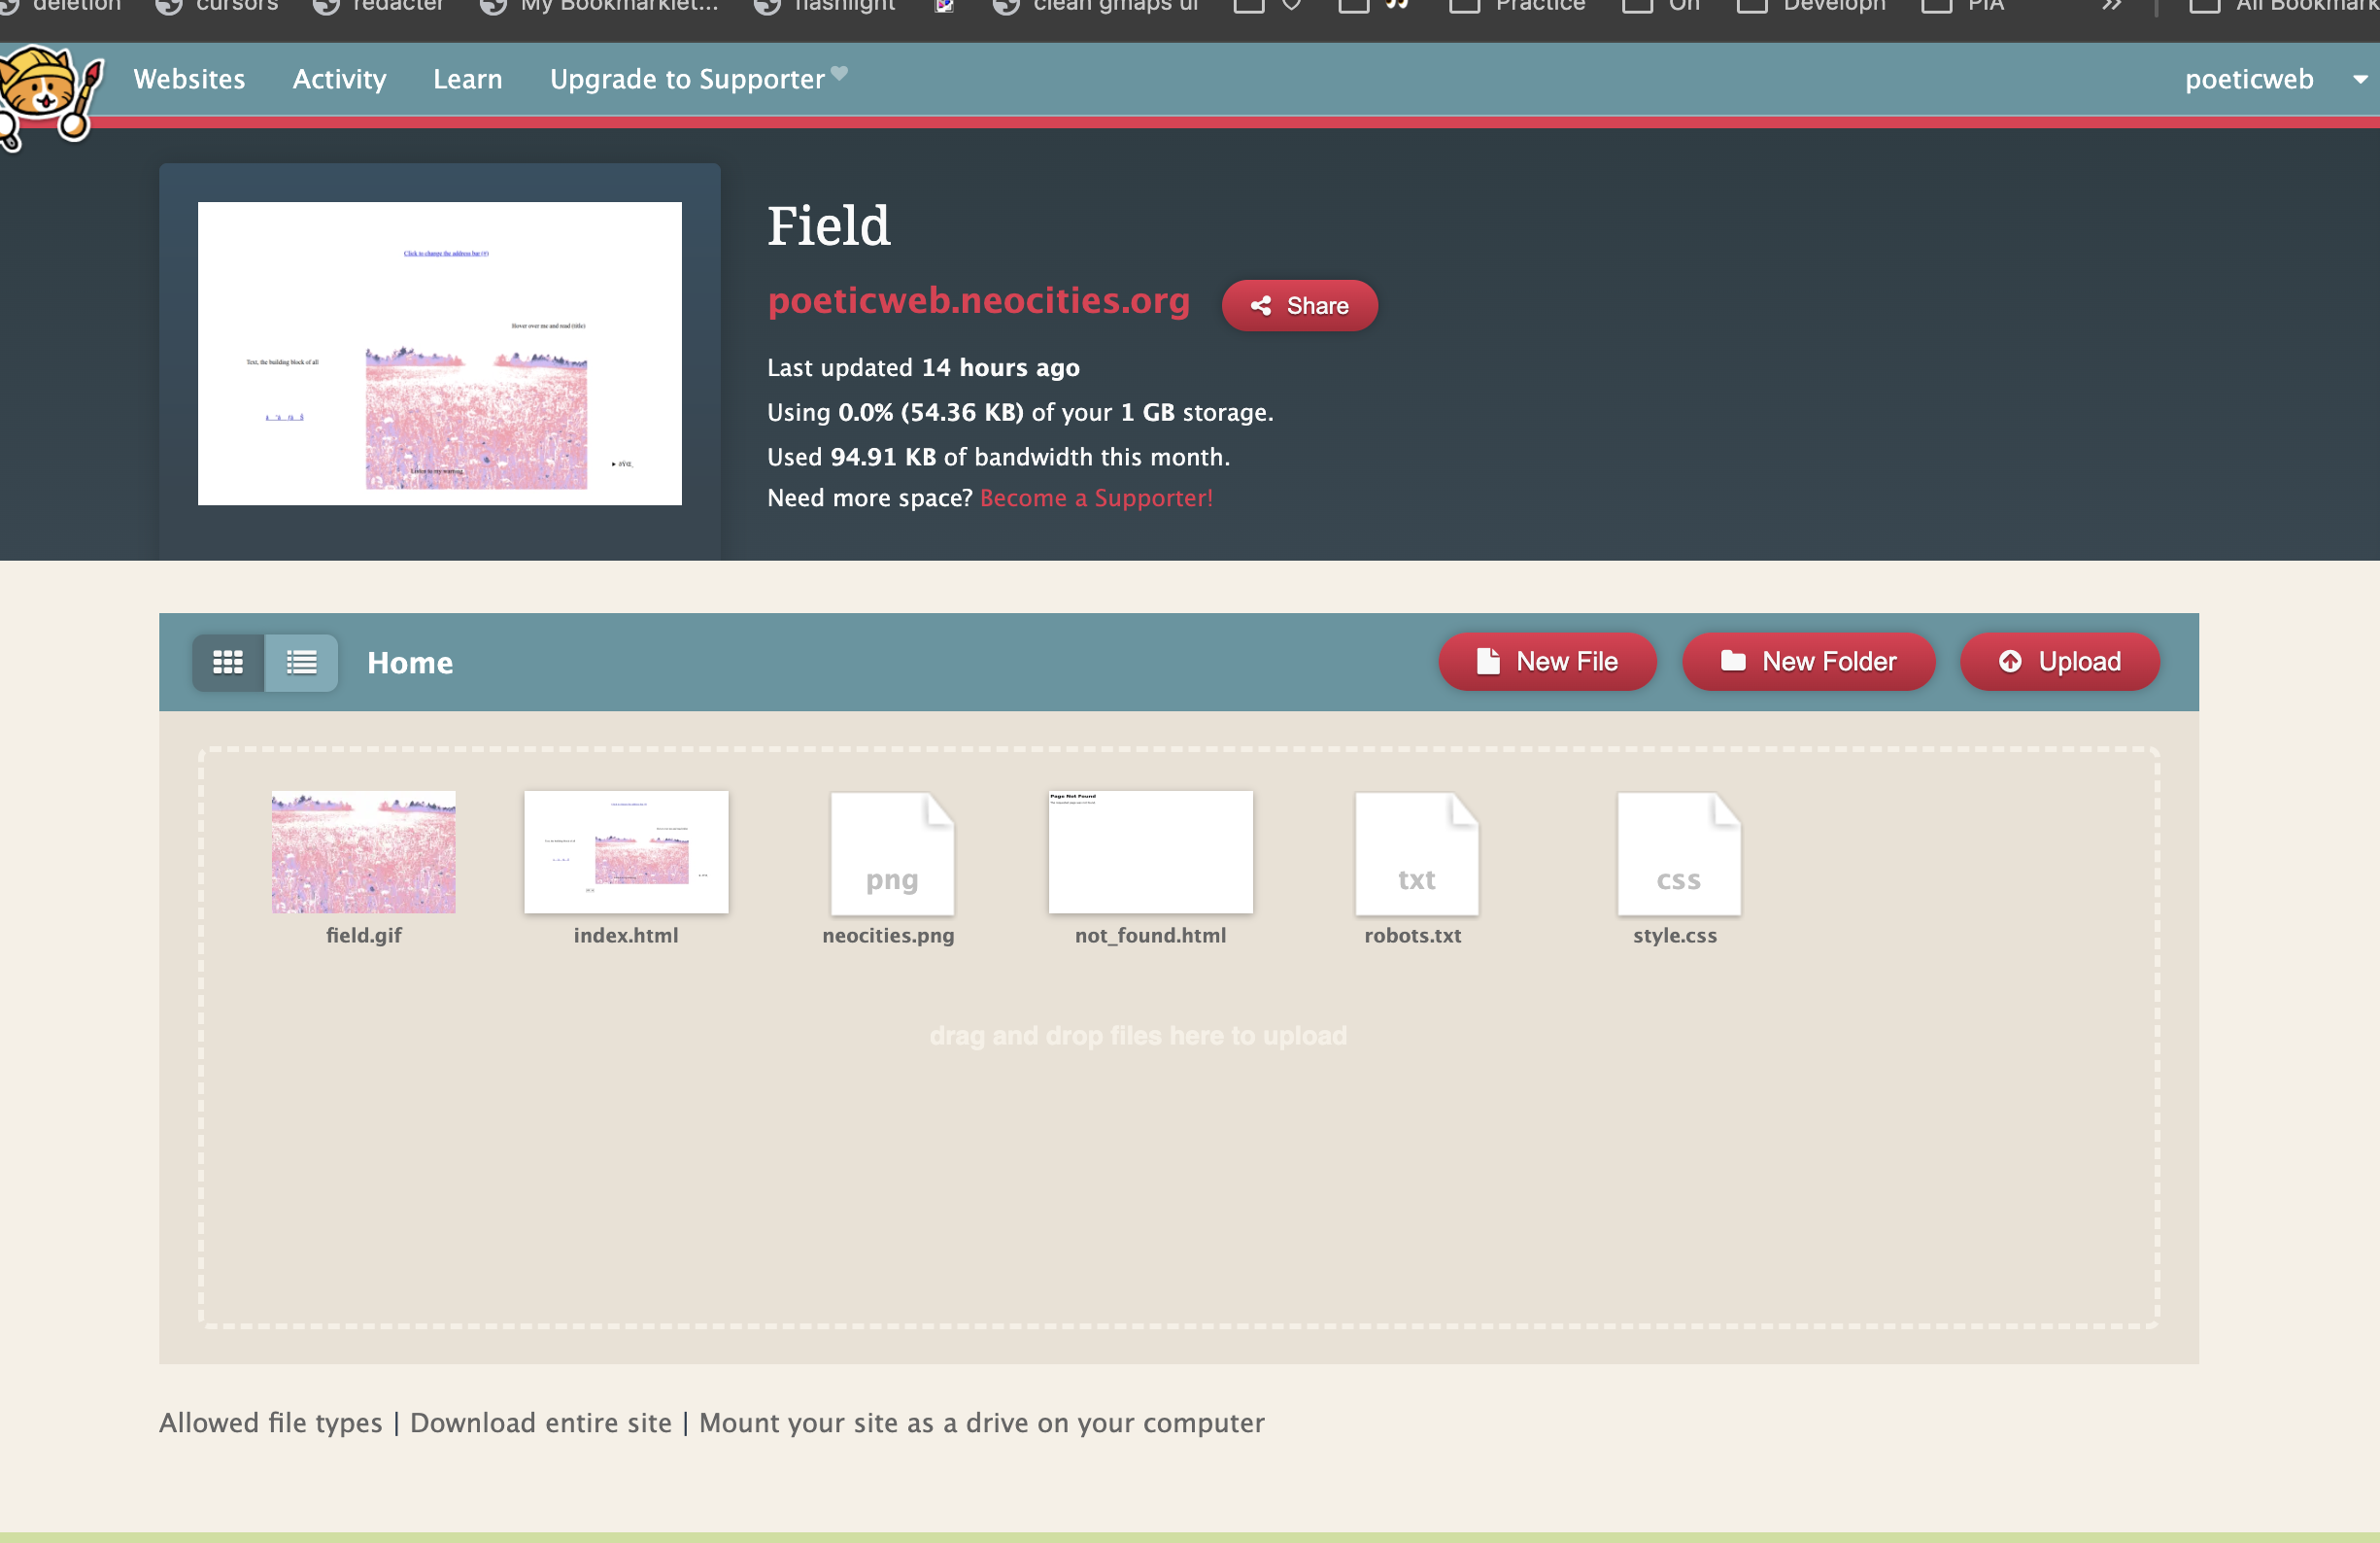
- Try to make a change to your site. Hover over the 'index.html' file and change some contents.
- Hit 'Save', then click 'View' to see your live site.
Exercise: Cloudwatching
( Image Maps )
In this warmup exercise, we'll use image maps to create a slow-moving flow of thoughts and text between you and a webpage. It is an introduction to code without touching code quite yet; a way to think about image and text together.
HTML Image Maps allow you to define specific regions on an image. While it's possible to use these for their intended purpose of navigation, we'll interact with it in a slower way — through the title attribute, which results in tooltip text that only appears when you hover over the region. (Try hovering over me.)
We won't touch code until the very end — so first, think about the types of thoughts, narratives, questions, or ideas you'd like to convey on the internet, and how some image might be a promising vessel for those thoughts. You might think of a more ambiguous image like a sky or a sea, or something more specific like a human body or a diagram.
The only way to reveal the text is to hover over the image – slowly, without any other textual guidance. As you play out the image, your method of reading and moving will guide the text, as much as the prework.
Steps
- Find an image of your liking, either from your own computer or from somewhere on the internet. Think of an image that is ambiguous and vast (like a sky) or something specific & structured (like a diagram).
- Open the image-map.net webpage and upload the image.
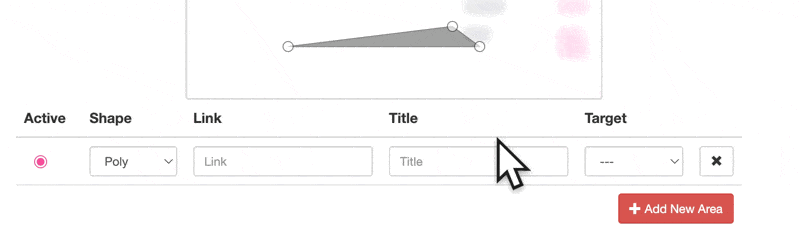
- Define the region that this text will appear in: Change the 'Shape' option, and then click on points in the image to define the region. If set to Rectangle or Circle, 2 clicks are enough. If set to Poly, you'll see the edges of your polygon and need at least 3 clicks to define a shape.
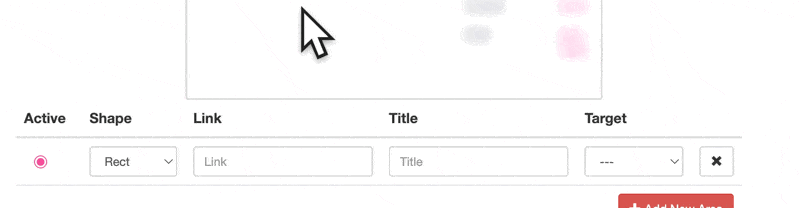
- Write the text that will show up: Below the image, enter text in the 'Title' column.

- Create more regions: Hit 'Add New Area' and click on the 'Active' radio button to set it as the active region. Then, you can set a Shape and type your Title as usual.
- Keep writing text. Write and think. Don't think about code. Draw and delete and write and imagine how the words might appear around.
- When you're done, click Show Me The Code! – copy it, and paste it into the code editor of your choice (like Neocities).
Tip: You can also use a tool like htmledit.squarefree.com to quickly preview the code: - If you're using your own image (not an external URL),
make sure to upload the image to your site and get the direct URL — replacing it in the code if needed. Below, you'll need to replace the sky.gif piece with a link to your image.
⤷ Wondering how to upload an image? Go to your Neocities dashboard and hit 'Upload' and select your file. You can hover over your file afterwards to rename it. Then, you'll type this filename (like field.gif or picture.png; try to avoid spaces) in your code.
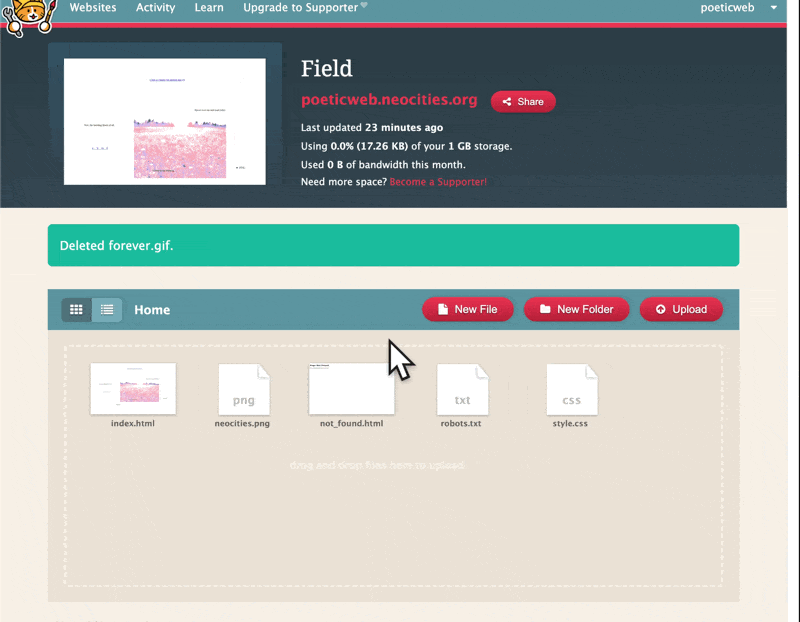
Image maps
An image map is an image and list of coordinates that defines clickable region sof an image. These regions can direct you to another page, or you can use their attributes to write out scenes. ( More on image maps )
You can use a tool like image-map.net to help you create coordinates with visual representation.
title attribute
The default 'title' attribute on any element is revealed as a tooltip when you hover over it.
This is used for accessibility & clarity, but can also be used for poetic inquiry... any element can take this — including the area coordinates on the image map.
Hosting your conversation
Now, upload your conversation to your site so you can let others engage, too.
Paste the link to your site in our Class Doc, under the 'Slow Conversations' section.
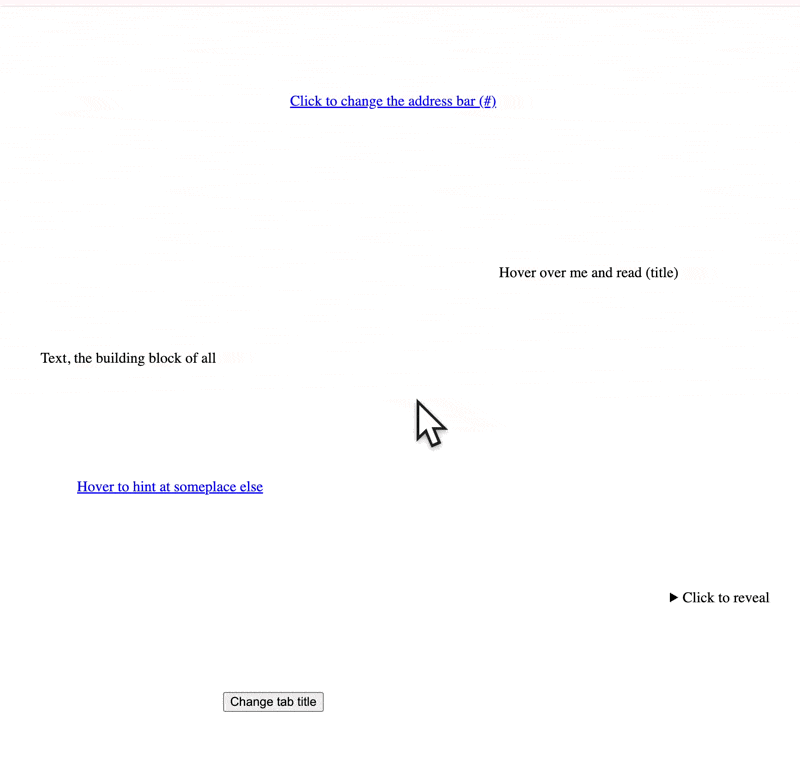
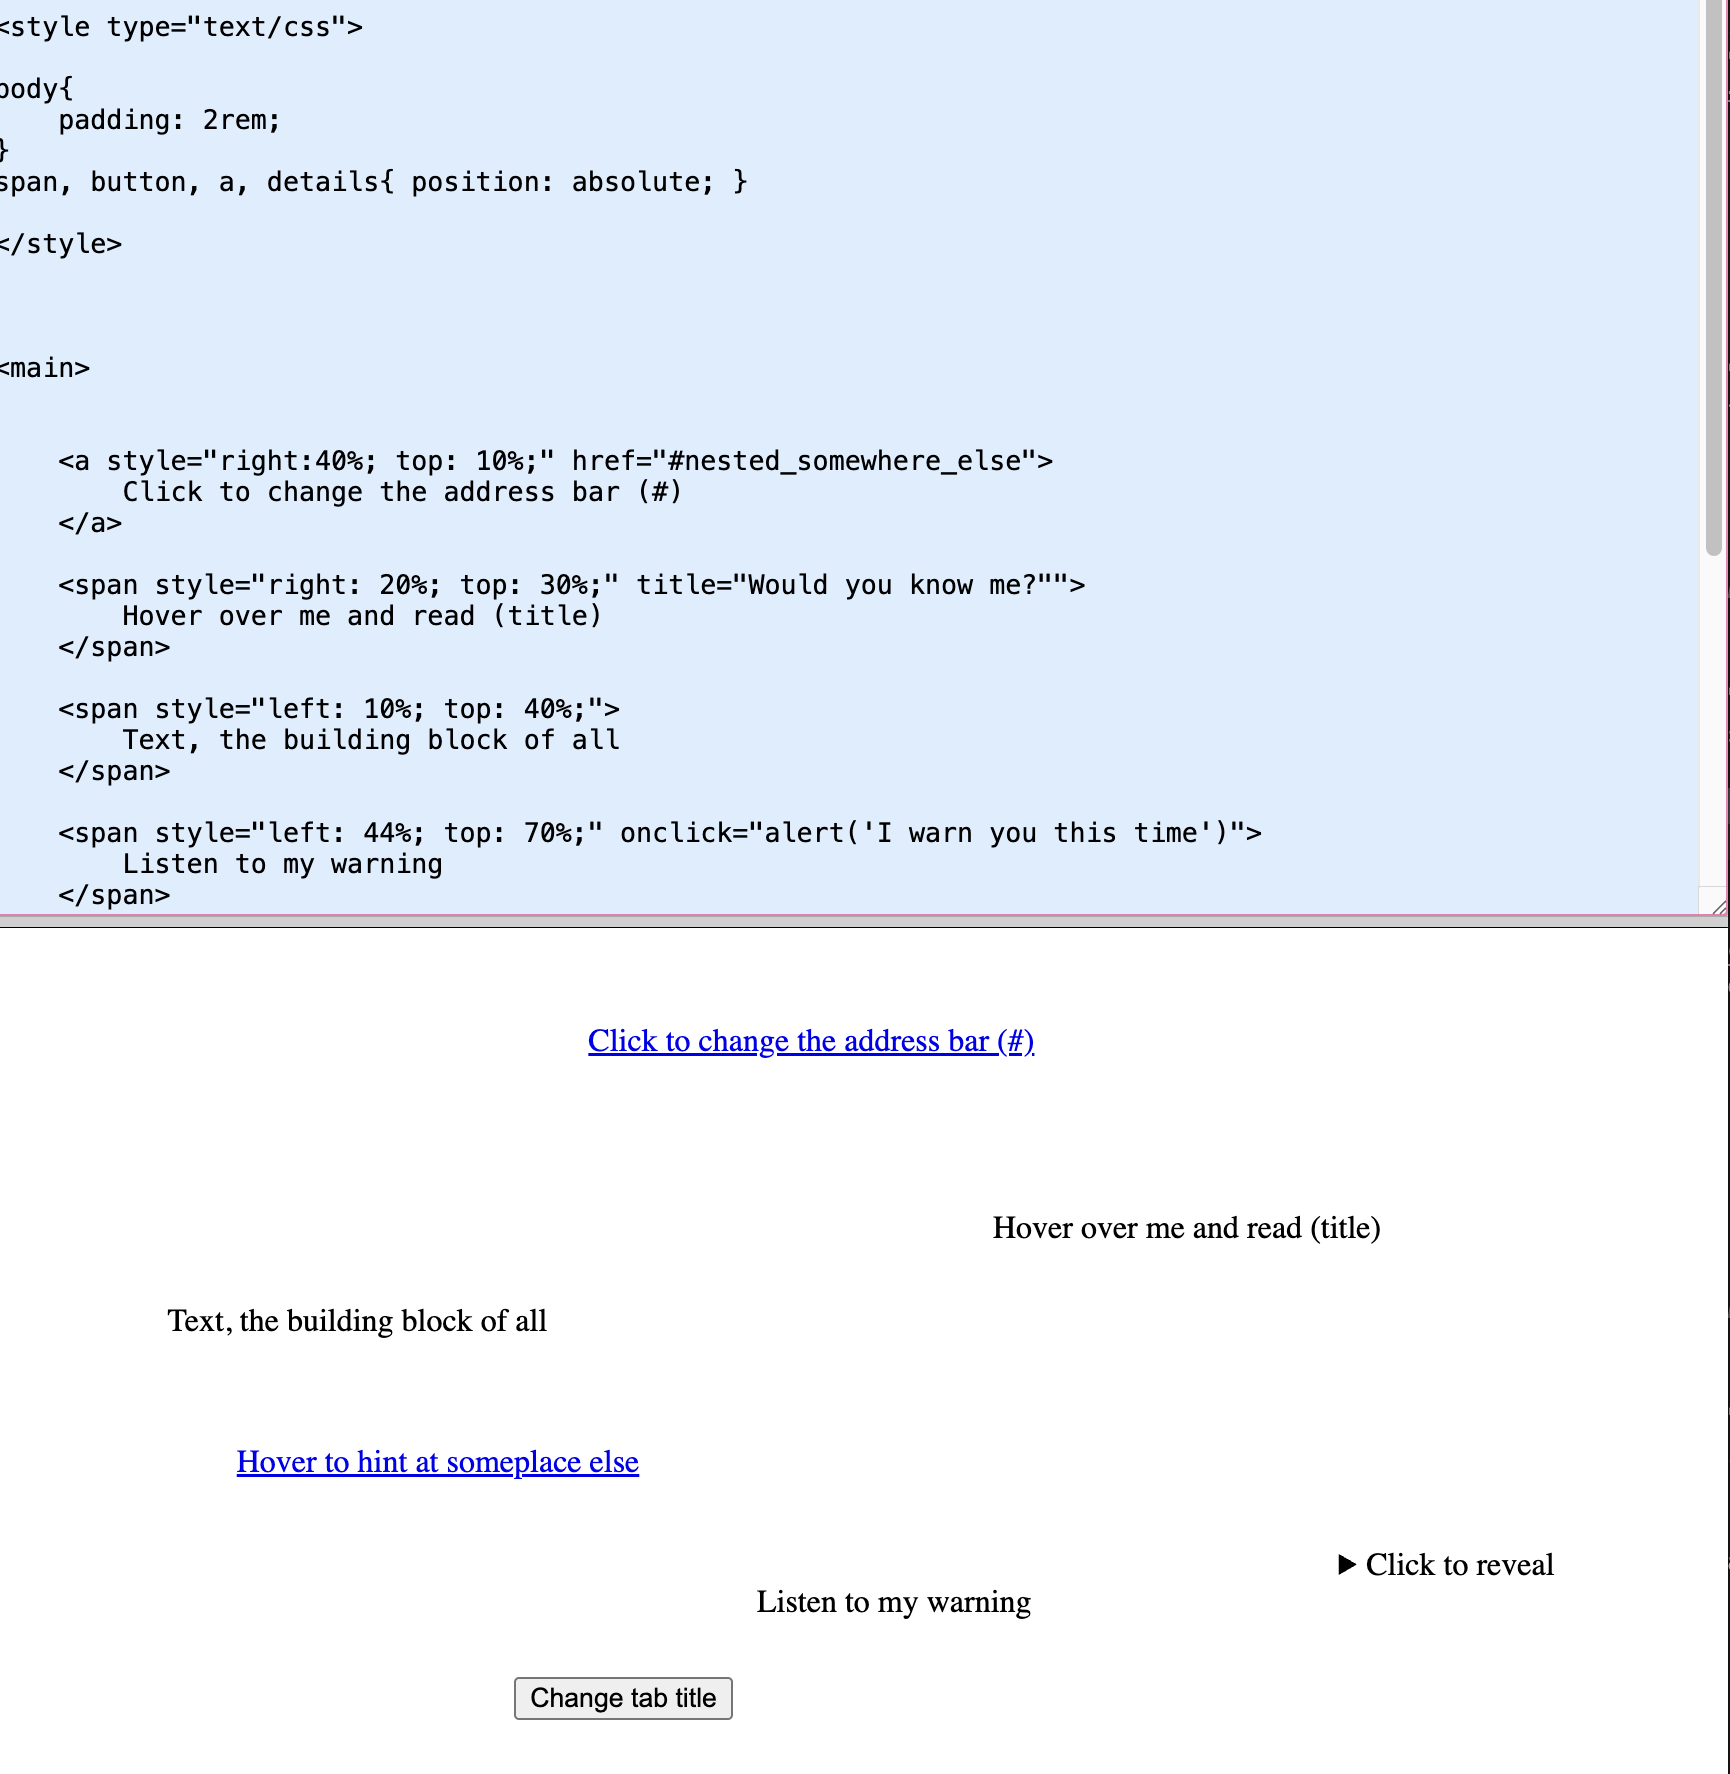
Exercise: Reading the Edges
( document.title, title, alt, text )There is more to a site than what is immediately visible or legible. How can can we attend to the edges of a site, beyond what is immediately visible?
In this exercise, we'll create a small site that repurposes common elements that draw attention to the edges of a site — paying heed to attributes we may not normally attend to.
A site to be read
Click to reveal
This is a secret
Steps
-
To quickly see our changes live, we'll use a WYSIWYG (what you see is what you get) editor that works in the browser: htmledit.squarefree.com is one I've used for a long time.
Alternatively, open your code editor of choice (if you have a preference like Brackets, Atom, VSCode, or Cursor). - Open the example above in a new tab, right-click and view its source. We'll start with the example's source code, so select it all and copy-paste it into your code editor or the htmledit.squarefree.com editor — whatever works for you.
If you use htmledit.squarefree.com, you can see code at the top, and a live preview at the bottom.
-
Let's look into the code for each of the elements on the page.
 ⤷ Look at the structure of this bit of code: it tells us a lot about the syntax of HTML. For now, let's focus on changing values and seeing what happens to the object live.
⤷ First, focus on one element — it can be any of them. Try to make a change to the text that shows up so you can see what object it corrresponds to.
 Try changing these highlighted pieces first.
Let's make some changes to the code:
⤷ Change the left, right, top, bottom attributes to see how the elements move around the page.
⤷ Change the value of the href, title, alt, and text attributes to see how the text changes.
⤷ Duplicate one of the items, move it around, and set your own text. Delete other items as you wish.
- After making some changes, take a step back — try to spend as much time reading your site as you're focused on looking at it. Think about the language you're using, the narrative you're crafting, and how the words feel as they unfold on click or appear on hover...
Tags to try...
1. Anchor links
Anchor links (#), generally used to navigate to specific sections of the same page, append hashtag + some text to the address bar.
Try clicking me2. "title" attribute
The title attribute adds a tooltip to an element, that is revealed as you hover over it. It takes a while to appear at first...
3. Link destination
Most browsers preview the destination of a link as you hover over it. You can use this to write out other text instead...
Hover over me4. <details>
The <details> HTML element is a container for hidden content that can be revealed by clicking.
The summary text displays by default, and the remainder of the element is revealed on click.
5. document.title
Use document.title to change the title of the tab in the browser.
6. Hidden text
Color text invisibly (or very lightly), so that you must select it to read it.
You found me!7. Alert, Confirm, Prompt
Use alert(), confirm(), and prompt() to pop up dialog boxes that alert the user.
8. window.open
Pop up a new window, writing text into it.
Open a new window and writeExercise: A Website that's a Conversation
( image maps + reading at the edges )Now, we're going to combine the image map, text elements, and other images to create a small web landscape.
Think of a tiny webpage that contains a lot of hidden secrets: a single-page one that acts as a tour, a journey, a trip, or a conversation with another place.
Steps
- Start a new Neocities page and open a new htmledit.squarefree.com tab on your browser.
- Copy-paste your code from the last exercise — or start from scratch with the code below.
From scratch (select all with CMD-A, then copy with CMD-C): - Like in the previous exercises, try modifying the attributes and thinking of how to arrange your website. Keep previewing your changes until you're satisfied.
- When you're ready to add an image map:
Go through the same flow in the cloudwatching exericse, using image-map.net to create your image map. Draw your regions and download the code.
Paste the image map code into your code editor again, at the beginning of the main tag or at the end of it — your choice.
Your image map code will look like this:
- With your image map and several text objects in the page, try positioning them, moving attributes, etc.
⤷ Try to position your image somewhere else on the page:
⤷ The styling rules we're adding are 'inline CSS', meaning that the CSS is directly attached to the element it modifies.
When writing the values of a position for attributes liketoporleft, we can use different units to indicate distance: such aspxfor pixels, or%to move something to a percentage of the page's width/height.
Adding additional images
You can add images to your site by using the <img> tag.
<img src="https://placehold.co/600x400">
Change the srccode portion to an image URL of your choice. (For example, by right-clicking an image and copying its URL/image address.)

Changing triggers
For non-link elements (not <a>), try different 'triggers' like onmouseenter to change the action that causes your text to reveal itself. We normally use onclick like below... (try clicking it!)
<span onclick="alert('gone forever')">click me</span>
But we can change onclick to different triggers, changing the action of your cursor that makes the alert appear. Like below, which triggers the alert on mouseenter instead.
<span onmouseenter="alert('gone forever')">hover me</span>
Some event triggers:
onclick, onmouseenter, onmouseleave,
to detect internet connection: onoffline, ononline
to happen instantaneously: onload
on pressing a key:
onkeydown.
Don't forget to share your work...
Open our Class Notes and paste in the links to your exercises if you'd like
Advanced Stuff
Favicons
Try using favicons to animate text in the tab title, either on a single tab, or through many tabs.
View a single tab example (inspect the code) Download the letters to make your ownBrowser History
Writing into the browser history...
View this example (inspect the code)
Everything
( Folders )
Use the natural structure of file directories and reloads to make a website that continously brings you to another page...
Reloading the page
This bit of code can be added to the <head> of your webpage to reload the page after a certain amount of time.
Folder structures
Naturally, websites use tree-like folder structures to organize their content. Subfolders are denoted by a forward slash.
Type words or poems out of file names, and continuously redirect to the next page.